
I bought my IKEA KALLAX unit four years ago for $35 on Facebook Marketplace. It had survived two moves, one cat, and a questionable choice of turquoise contact paper by the previous owner. When my lease renewal landed on my counter with a 60-day warning, I looked at that sad, scuffed shelf and thought: I can fix you. But I had to do it fast, cheap, and without a garage — because I rent, and because my hallway is also my living room. This is the beginner's guide to spray-painting IKEA furniture I wish I'd had: how to turn laminate into something that looks intentional, before your lease is up and without losing a dime of your deposit.
Why IKEA Furniture Is the Renter's Best Test Subject
IKEA pieces are mostly laminate over particleboard — which sounds like a downside until you realize it makes them perfect for beginner furniture flipping. The surface is smooth, the shapes are simple, and if you ruin it? You're out $35, not $350. Unlike solid wood, you don't need to strip anything. You just need to prep the slick surface so paint sticks. For a renter on a timeline, a cheap furniture flip like this is the lowest-stakes way to learn spray-painting without crying in a parking lot. It also means you can flip multiple pieces over a weekend and still have time to binge something.
The Pre-Spray Checklist (Don't Skip This)
I learned the hard way that spray paint on raw IKEA laminate beads up like water on a windshield. Here's what you need: a degreaser (Krud Kutter is my go-to), 220-grit sandpaper, a tack cloth, a spray primer that bonds to plastic and laminate (I used Zinsser Bullseye 1-2-3), and your color coat. I chose Rust-Oleum Painter's Touch 2X in Matte Coastal Blue. Do not use chalk paint without sealing it — it will scratch if you breathe on it. This entire DIY spray paint furniture process costs about $30 in supplies if you're starting from scratch, and every single one fits in a tote bag you can carry outside.
The 5-Step Spray-Paint Process I Used on My KALLAX

Step 1: Clean and scuff. Wipe every surface with degreaser, then lightly sand with 220-grit. You're not removing the finish — you're giving the primer something to grip. Wipe down with a tack cloth. I did this on my balcony with a podcast and a coffee. It took 20 minutes.
Step 2: Prime like you mean it. One thin, even coat of bonding primer. Let it dry for at least an hour. I set up a spray booth using a flattened cardboard box behind the unit and a drop cloth made of old Amazon packaging. Very glamorous.
Step 3: Color coat, light layers. Three thin coats of spray paint, not two thick ones. Hold the can 10–12 inches away, sweep side to side, and release the nozzle at the end of each pass. Wait 20 minutes between coats. I got impatient on the second coat and created a small drip on the side. I call it "texture."
Step 4: Cure, don't touch. Let the piece dry for 24 hours before you put anything on it. I moved mine inside after four hours and the paint smelled for a day. Open a window. Kevin the pothos was not impressed.
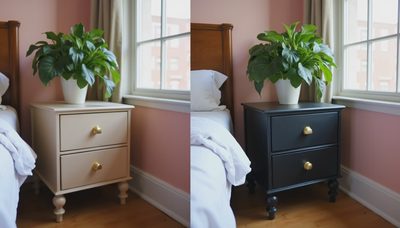
Step 5: Optional topcoat. If the piece will get heavy use — like a nightstand drawer front — seal it with a water-based polycrylic. I skipped this on the shelf body because it holds books and baskets, not keys and coffee cups. A renter IKEA makeover prioritizes function over perfection.
What This Has to Do With Your Lease
My lease doesn't allow "unapproved furniture alterations." But here's the thing: I'm not altering the apartment. I'm altering my furniture, which I will take with me when I go. Spray-painting your own IKEA piece has zero impact on your deposit, because it touches nothing that belongs to the landlord. This is a thrifted furniture flip mindset applied to modern flat-pack: you own it, you improve it, you haul it to the next place. Before your lease ends is actually the perfect time to do this, because if you mess up, you're already in moving mode and can decide to let it go. But if it works — and mine did — you've got a custom piece ready for the next apartment.
What I'd Do Differently
I didn't sand enough on the edges, so the paint wore thin where the baskets slide in and out. I also didn't label my shelves before removing them, which led to a puzzle-like reinstallation process that involved swearing. And I definitely should have used a respirator mask instead of a bandana, because I tasted blue for an hour. All of that is the kind of renter furniture flip honesty that doesn't make it onto perfect before-and-after posts. But the shelf is blue, it's mine, and it looks like I planned it. That's a win.
No letters yet — be the first guest to write.